Globalswift.net WooCommerce Plugin Installation guide
-------------
First, click here to download the globalswift WooCommerce plugin
---------
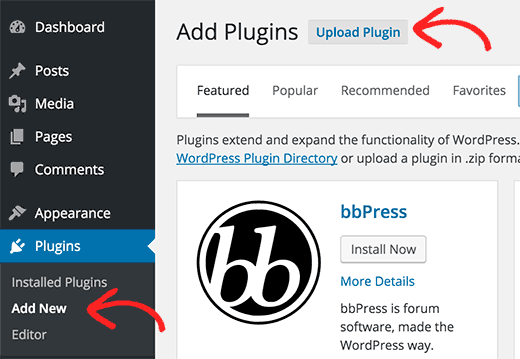
After downloading the plugin (which will be a zip file), you will need to go to WordPress admin area and visit Plugins » Add New page.
After that, click on the Upload Plugin button on top of the page.
This will bring you to the plugin upload page. Here you need to click on the choose file button and select the plugin file you downloaded earlier to your computer.

Select globalswift-woocomerce-plugin.zip you downloaded then press open as shown below..
|
Cancel |
|
Open |

After you have selected the file, you need to click on the install now button (see below).

WordPress will now upload the plugin file from your computer and install it for you. You will see a success message like this after the installation is finished
Once installed, you need to click on the Activate Plugin link to start using the plugin. (see below)

If successfully installed it will appear like this (see below)

Now you should configure the settings to fit your add api keys in your site. These settings will help you accept payments online from your site.
Now click on the WooCommerce(menu) , go to settings and then go to Payments tab
You will find the Globalswift as a gateway.

Click on the manage button. (see below)

You will see the following Page to input your merchant credentials (client ID and client secret).

Then go to your globalswift merchant account, loging here. Copy the Client ID & Client Secret to paste it in your globalswift pugin seetings. (see below

To get your Api info you need register a new Merchant and choose express type as below (see picture) choose mechant name, your site url your currency and choose express for wordpress sites and standard for php site to get the code to embete in your webapages shop.

To display your Api credentials to add to your wordpress site, go to merchants then to seetings icone your API credentials will pop up.

Here are your Api credentials in the pop up windows

Add your credentials in the client ID and client secrete boxes and click save (see below)

Now the plugin installation is successful & ready to take payments via globalswift to your site. Go to your store as a customer to test, add a product to cart and go to checkout page. You will find a Globalswift as a payment option .


|
Globalswift |

Now if you click on Place Order you will be redirected to globalswift payment page, if you are not logged in you will be redirected to the globalswift login page. After login successfully you will be asked to confirm the payment. After a successful payment you will redirect again to your wordpress site with a successful purchase message.

Buyers are protected by globalswift and can open a dispute if there any issue with the purchase

Globalswift integration for a php site
For a php and all other sites, create a new merchant as standard type. (see below)

Then go to merchants then to seetings icone you’re an html code will pop up. Enter the item name order number (optional) , price and custom (optional). Hit generate button, then copy the generated code and past it to your first item page. Do this for all your products available on sale on your site. (see a sample below)

Still Need help ? contact us : Open a ticket